Sunday, November 18, 2012

Sally Hansen Byte + Essie Sexy Divide

Hello everyone!  Yay, I finally have time to post!  My Thanksgiving break officially starts tomorrow, but I turned in my last assignment yesterday.  So, I get an extra day off.  Woot!

I wanted to show you another layering experiment from awhile back that I never posted - Sally Hansen Byte over Essie Sexy Divide.  Byte is a bright pink jelly base loaded with duochrome flakes that shift between pink and blue. Sexy Divide is a dark purple shimmer with some blue and red sparks here and there, but in certain light it looks like a dark plum.

This combination was so pretty and I could NOT stop staring at my nails.  They looked different in every light and I just love polishes like that.

Warning - pic heavy post ahead.  Enjoy!


Artificial light
Artificial light
Artificial light
Artificial light
Artificial light
Artificial light
Natural light

Thanks for stopping by!  See you again soon! :)

Tuesday, November 6, 2012

Pure Ice Meet Me In Monaco

Hello everyone!  Today I want to show you one of the new Pure Ice colors - Meet Me In Monaco. 

Meet Me In Monaco is a glitter bomb suspended in a dark, brownish-black jelly base.  There are 2 colors of glitter - champagne and dark copper.  There are large and small hexes, plus tiny squares in both colors.  The formula was somewhat thick, but easy to work with.  I needed two medium-thick coats for opacity.  Like many glitters, this one was a top coat eater and I needed 3 coats of top coat to even it all out.

I am so in love with this polish!  It's perfect for fall.

Artificial light.


Natural light.

Have you purchased any of the new Pure Ice polishes?  Which ones did you get?

Thanks for reading! :)

Saturday, November 3, 2012

OPI You Only Live Twice (Skyfall Collection)

Hello everyone!  I have another polish from the OPI Skyfall collection to show you - You Only Live Twice.  This is such a pretty polish, and I love the color for this time of year.  I don't have anything like it in my collection, so I am happy I purchased it. 

You Only Live Twice is a deep magenta with tiny color-shifting flakes dispersed throughout.  They are primarily pinkish-red but in certain light they shift to gold.  The formula was great and I had complete coverage in two coats.  Shown with top coat.

Natural light.

Natural light.

You can see the gold in this one:

Natural light.

Thanks for reading! :)

Friday, November 2, 2012

OPI The Living Daylights (Skyfall Collection)

Good morning lovely readers!  I am super excited today because I found the entire OPI Skyfall collection practically untouched at my local beauty supply store.  Usually everything is picked over when I get there, but apparently they've only had the collection for a week ... !!  I think most of the collection is pretty, but I already have something similar to most of them, so I only purchased two: The Living Daylights and You Only Live Twice.

Today I want to show you The Living Daylights, a gorgeous glitter bomb consisting of silver, pale gold, copper, and teal glitters suspended in a clear base.  All of the glitters are the same size and it's densely packed in there!  I wasn't expecting it to be so dense, so I was sort of globbing in on the nail and then trying to push this huge mass of glitter around.  Next time I'll have to get less on the brush.  Yeah.

Anyway, I love this polish!  I love the color combination for fall and I feel like it could layer beautifully over a wide variety of colors.  I chose Sally Hansen Gilty Pleasure as my base. This is one coat of The Living Daylights.  Then, I matted it with NYC Matte Me Crazy.

Artificial light

Artificial light


 What do you think of the Skyfall Collection? Which ones do you want to buy?

Thanks for reading! :)

Tuesday, October 30, 2012

Halloween Manicure - Spiders!

Happy Halloween lovlies!  I hope you're all doing well and rocking some gorgeous manicures!  Halloween is one of my favorite holidays and I love seeing so many creative manicures this time of year.

This year, I decided to use some stamps because I have a lot of plates with Halloween themes on them.  It was so hard to choose, but I finally decided on spiders.

I started with 2 coats of Wet n Wild Caught Red Handed, a super shiny, bright red jelly.  I used Sinful Colors Black on Black to stamp, and Shany plates SH01 and SH09.

I sealed the design with a coat of quick dry top coat.

Natural light.


Natural light.

Thanks for reading!!  Have a great holiday! :)

Wednesday, September 12, 2012

Wet n Wild Eggplant Frost

Hello everyone!  Long time, no talk!  School started up again a couple weeks ago and I've been busy busy.  I wanted to do a quick post today just to let you all know that I'm not being a derelict on purpose.  It's just tough to balance everything sometimes.  I'm toying with the idea of doing a weekly posting, so that my posts don't seem so erratic and that way I can consolidate everything into one longer, more comprehensive post.  We'll see.

Anyway, I didn't want to write a post without giving you something pretty to look at, so I found a photo of Wet n Wild Eggplant Frost that I never shared with you.  This was sort of an accidental discovery for me.  When I originally purchased it, it was part of a sale and I had to buy 3 bottles.  I didn't want 3 bottles of the same thing, so I ended up picking out a few random colors and Eggplant Frost ended up in the basket.  Well, what a little beauty!!!  Let me start by telling you to ignore the "frost" in the name.  I don't think it's frosty at all.  It's a deep plum base with a blue shimmer.  Very pretty, and a gorgeous fall color.  I've actually been wearing this one a lot lately when I can't decide on a color.  I'm drawn to purples anyway, so maybe I'm a little biased, but I honestly think this one deserves more love.

Two coats plus quick dry top coat.

Artificial light.

As always, thanks for stopping by and reading!!!  :)

Thursday, August 9, 2012

NOTD: Stamping with Color Club Artsy Crafty + Sinful Colors Gorgeous

Hey there everyone!  Today I have a stamped manicure to show you.  I love using a creme base and then stamping over it with something sparkly to make it pop. 

I used Color Club Artsy Crafty, a dark sage green creme as the base.

I stamped using Sinful Colors Gorgeous, which is actually very pretty, so the name is fitting.  It's a deep turquoise shimmer with a subtle gold-green-blue duochrome shift.  The duochrome isn't very obvious in the bottle, but it showed up nicely in my pictures.

I used two coats of Artsy Crafty and stamped over it using Shany Plate SH25.  I finished it with quick dry top coat.

I know this post is rather short, but I feel like the pictures do an adequate job of conveying how pretty it is. :)


Artificial light.


Artificial light.


Natural light.

Thanks for reading! :)

Saturday, August 4, 2012

NOTD: Layering and Sponging - An Experiment

Hello everyone!  Today I have some pictures for you that are the result of a sponging and layering experiment.  When I created this mani I wasn't sure what exactly I wanted.  I was just messing around and this is what I came up with.  Admittedly, it's not my favorite manicure, but I like posting photos because you never know when something will inspire someone else. :)

I started with 3 coats of LA Colors Energy Source.  Then, using a folded piece of paper towel, I "sponged" on Island Girl Aloha Luau.  Finally, I added a coat of Nubar 2010 and finished it with quick dry top coat.


Natural light.


Natural light.

I like how the flakies add a little extra sparkle to the nails.  Sorry the photos are a little dark, but I found that low light really makes the flakies glow.

Thanks for looking! :)

Tuesday, July 31, 2012

Tiny Striped Nail Art


Hello everyone! I discovered a new technique for making stripes on your nails and I had to try it.  I'm not sure if any of you are familiar with this technique, but I had never seen it until recently.  Here's the YouTube video I used: http://youtu.be/o5CTNGcFbzg.

You basically put a couple drops of polish on a (disposable) surface and swirl it with your dotting tool or orangewood stick.  Keep swirling it and lifting up some polish until it gets thick and stringy.  Then, once it starts making thin threads (think spider webs) you pull them over your nail and wrap, so the thin threads stick to your base color.  You end up with these tiny little stripes of polish on your nails.  It's a pretty neat method, but I will say it took forever.

I started with two coats of Sally Hansen Mellow Yellow, a bright yellow creme.  Then, for the stripes I used Sinful Colors Timbleberry, a pink creme, and Sinful Colors Big Daddy, an orange jelly.  I finished with a coat of quick dry top coat.

It's hard to see the pink and orange separately in these photos, but it makes for a pretty finished look.


Artificial light.

Artificial light.

Thanks for reading!! :)

Monday, July 30, 2012

Gradient Tape Manicure

Hello lovelies!!  Today I have two fun nail art trends to show you: a tape manicure combined with a gradient!  Tape manicures are super fun because they're so simple and you don't need any fancy nail art supplies to do them.

Artificial light.

I started with the gradient.  I applied one coat of LA Colors Live, a silver foil.  Then, I added LA Colors Electrified, a dusty pink foil.  (I didn't have a sponge available so I just dabbed the colors onto the nail using the brush.)  I finished the gradient with Sally Hansen Byte, a bright pink glass-flecked jelly.

Here's the gradient:

Artificial light.

Then I cut pieces of plain plastic tape into thin strips and just randomly placed them on my nails in different designs.  I didn't worry about them being the exact same width because I like it when each nail is different.  I painted over the tape with Sally Hansen Black Diamond, a black glass-flecked jelly.  I pulled the tape off as soon as I finished each nail and that's it!  I lastly applied a coat of quick dry top coat.

Here's the final look:

Artificial light.

Easy right?  Thanks for reading! :)

Saturday, July 28, 2012

L'Oreal Blue Marine vs. Sally Hansen HD Spectrum

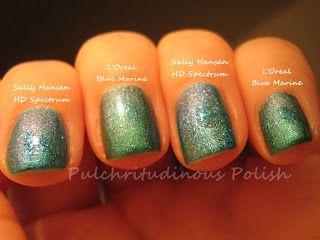
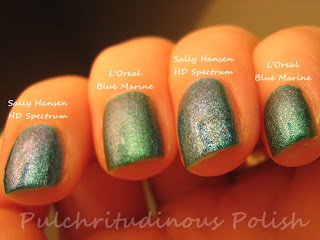
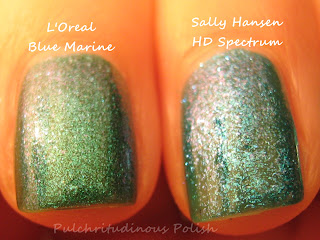
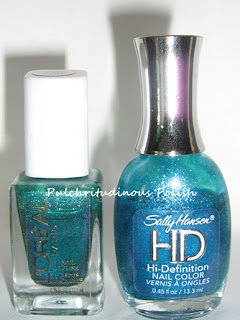
As promised, I wanted to provide some comparison swatches of L'Oreal Blue Marine and Sally Hansen HD Spectrum.  When I first purchased Blue Marine I realized it was very similar to Spectrum and of course worried that I had a dupe.  Luckily I was wrong!  These two colors are very similar, but not enough to call them dupes.

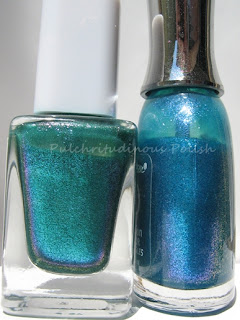
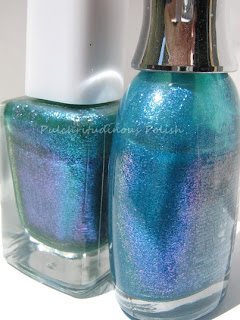
As you can see, there are some subtle differences.  This is 3 coats of each, without base coat or top coat.

Artificial light.


Artificial light.


Artificial light.


Sunlight.


Flash.


Sunlight.


Sunlight.


Blue Marine leans more green, has smaller duochrome flecks (making it more opaque), and has a less obvious duochrome shift.

Spectrum leans more blue, has chunkier duochrome flecks (creating more bald patches on the nail), and has a very obvious color shift.

Both polishes seem to have the same color shifting flecks (green-blue/purple-pink), although they're in different sizes.

These are similar enough that you could probably have one without the other, but they're definitely not dupes.

As always, thanks for reading! :)

Friday, July 27, 2012

L'Oreal Blue Marine

I was digging through my stash the other day and realized I've never actually worn L'Oreal Blue Marine by itself or shown any photos of its awesome duochrome shift.  I've always paired it with something else and its awesomeness is obscured by the other polishes.  So, I decided to show it off today.

Blue Marine is a sheer turquoise/teal base with color shifting flecks.  The flecks shift from a deep emerald green to blue/violet to magenta.  It's very pretty, and like many duochromes, the shift seems more obvious in low light or under indirect light.

This is 3 coats without base coat or top coat.


Artificial light.


Artificial light.


Artificial light.


Artificial light.


Artificial light.

Direct sunlight.

I really love this color.  Check back tomorrow for my comparison swatches of L'Oreal Blue Marine vs. Sally Hansen Spectrum.

Thanks for reading!! :)

Thursday, July 5, 2012

Sinful Colors Big Daddy + Revlon Radiant Accent

Hey there!  If you've seen my past few posts, you'll notice that I've been on an accent nail kick lately.  I'm not sure why, but suddenly adding a pop of glitter to a creme manicure seems so appealing.  So, naturally, I have another glitter accented manicure for you today.  I should also mention that I've been on an orange and pink kick lately, presumably because I associate those colors with warm, summery days. :)

Alright, on to the manicure.  I started with Sally Hansen Hard as Wraps base coat (in the blue bottle) because it acts as a really good ridge filler on my nails.  Next, I used two coats of Sinful Colors Big Daddy, a juicy, reddish-orange jelly.  This one is extremely shiny and looks perfectly slick when dry.  Application was fantastic and, as I mentioned, it dries so shiny. Yum!

For the accent nail I used two coats of LA Colors Live, a silver metallic.  Then, I layered over it with two coats of Revlon Radiant, a glitter bomb loaded with several sizes of light blue hex glitter, and larger silver and green hex glitter.  I topped it all off with quick dry top coat.

Photo taken in sunlight.

Thanks for reading!! :)

Tuesday, July 3, 2012

4th of July Nails!

Hello everyone!  Today I have my Independence Day manicure to show you.  I'm so excited because I'm usually terrible at stamping.  My images almost always end up smeared or off-center.  However, I feel like I did a pretty good job with placement this time.  It looks like a lot is going on, but this manicure was actually really easy.

Photo taken in sunlight.


The main white base is LA Colors Energy Source, but any white creme will work.  I used Konad Special Polish in red and blue for the stamps.  I used Shany plates SH 12 and SH 13 for the blue and red stars.  The star image is duplicated on both plates, so I alternated using red and blue polish on the stars.


Alternating the colors gave me a nice design because it allowed me to have large stars in both colors. You can certainly use only one plate, but you will have to clean it more often so the colors don't blend.

For the accent nail I used LA Colors Live, a silver metallic.  Then, I used Konad Special White Polish and Konad plate m3 for the design.

And that's it!  Finish it off with some top coat and you have a cute 4th of July manicure.

Photo taken in natural light.

Thanks for reading!! :)

Friday, June 29, 2012

LA Girl Disco Brites Turntable + Funky Accent

Hello again!  I have a fun summer manicure for you all today.  I recently purchased LA Girl Disco Brites nail polish, which is marketed as being black light responsive.  I haven’t had a chance to try it, but I’ll be going to cosmic bowling in a couple weeks and figured it would be perfect.  I grabbed the last bottle of Turntable, a bright, green-leaning turquoise creme.  I can’t describe the color perfectly, and my camera did a terrible job capturing it.  I did my best to correct the color, though.

Application was a breeze.  I only needed two thin coats for perfect opacity.  It dries exceptionally shiny and gorgeous.  I used top coat and it was even prettier.  It’s so glossy.

For the accent nail I used three thin coats of Sinful Colors Timbleberry plus two thin coats of Sinful Colors All About You.


Photo taken in natural light (color corrected).

I can't wait to see how it looks under black lights!  :)

Thanks for reading!

Wednesday, June 27, 2012

LA Colors Tropical Breeze + Sinful Colors Pearl Harbor

Hey everyone!  Today's post is going to be a bit photo heavy.  I wanted to show off Sinful Colors Pearl Harbor again.  (It's definitely one of my favorite glitter top coats ever).  It's not just glitter... it's iridescent glitter that goes from bright green to blue to violet.  It's super complex and I always stare at my nails when I'm wearing it.  I love that I can change the angle of my hands and see new colors or switch lighting and notice something I hadn't before.

This is 2 coats of LA Colors Tropical Breeze (blue-based purple creme) with one coat of Pearl Harbor.  Topped with quick dry top coat.


Photo taken in natural light.


Photo taken in artificial light.


Photo taken in artificial light.


Photo taken in artificial light.


Photo taken in artificial light.

Thanks for reading!  :) :)